

Desktop app
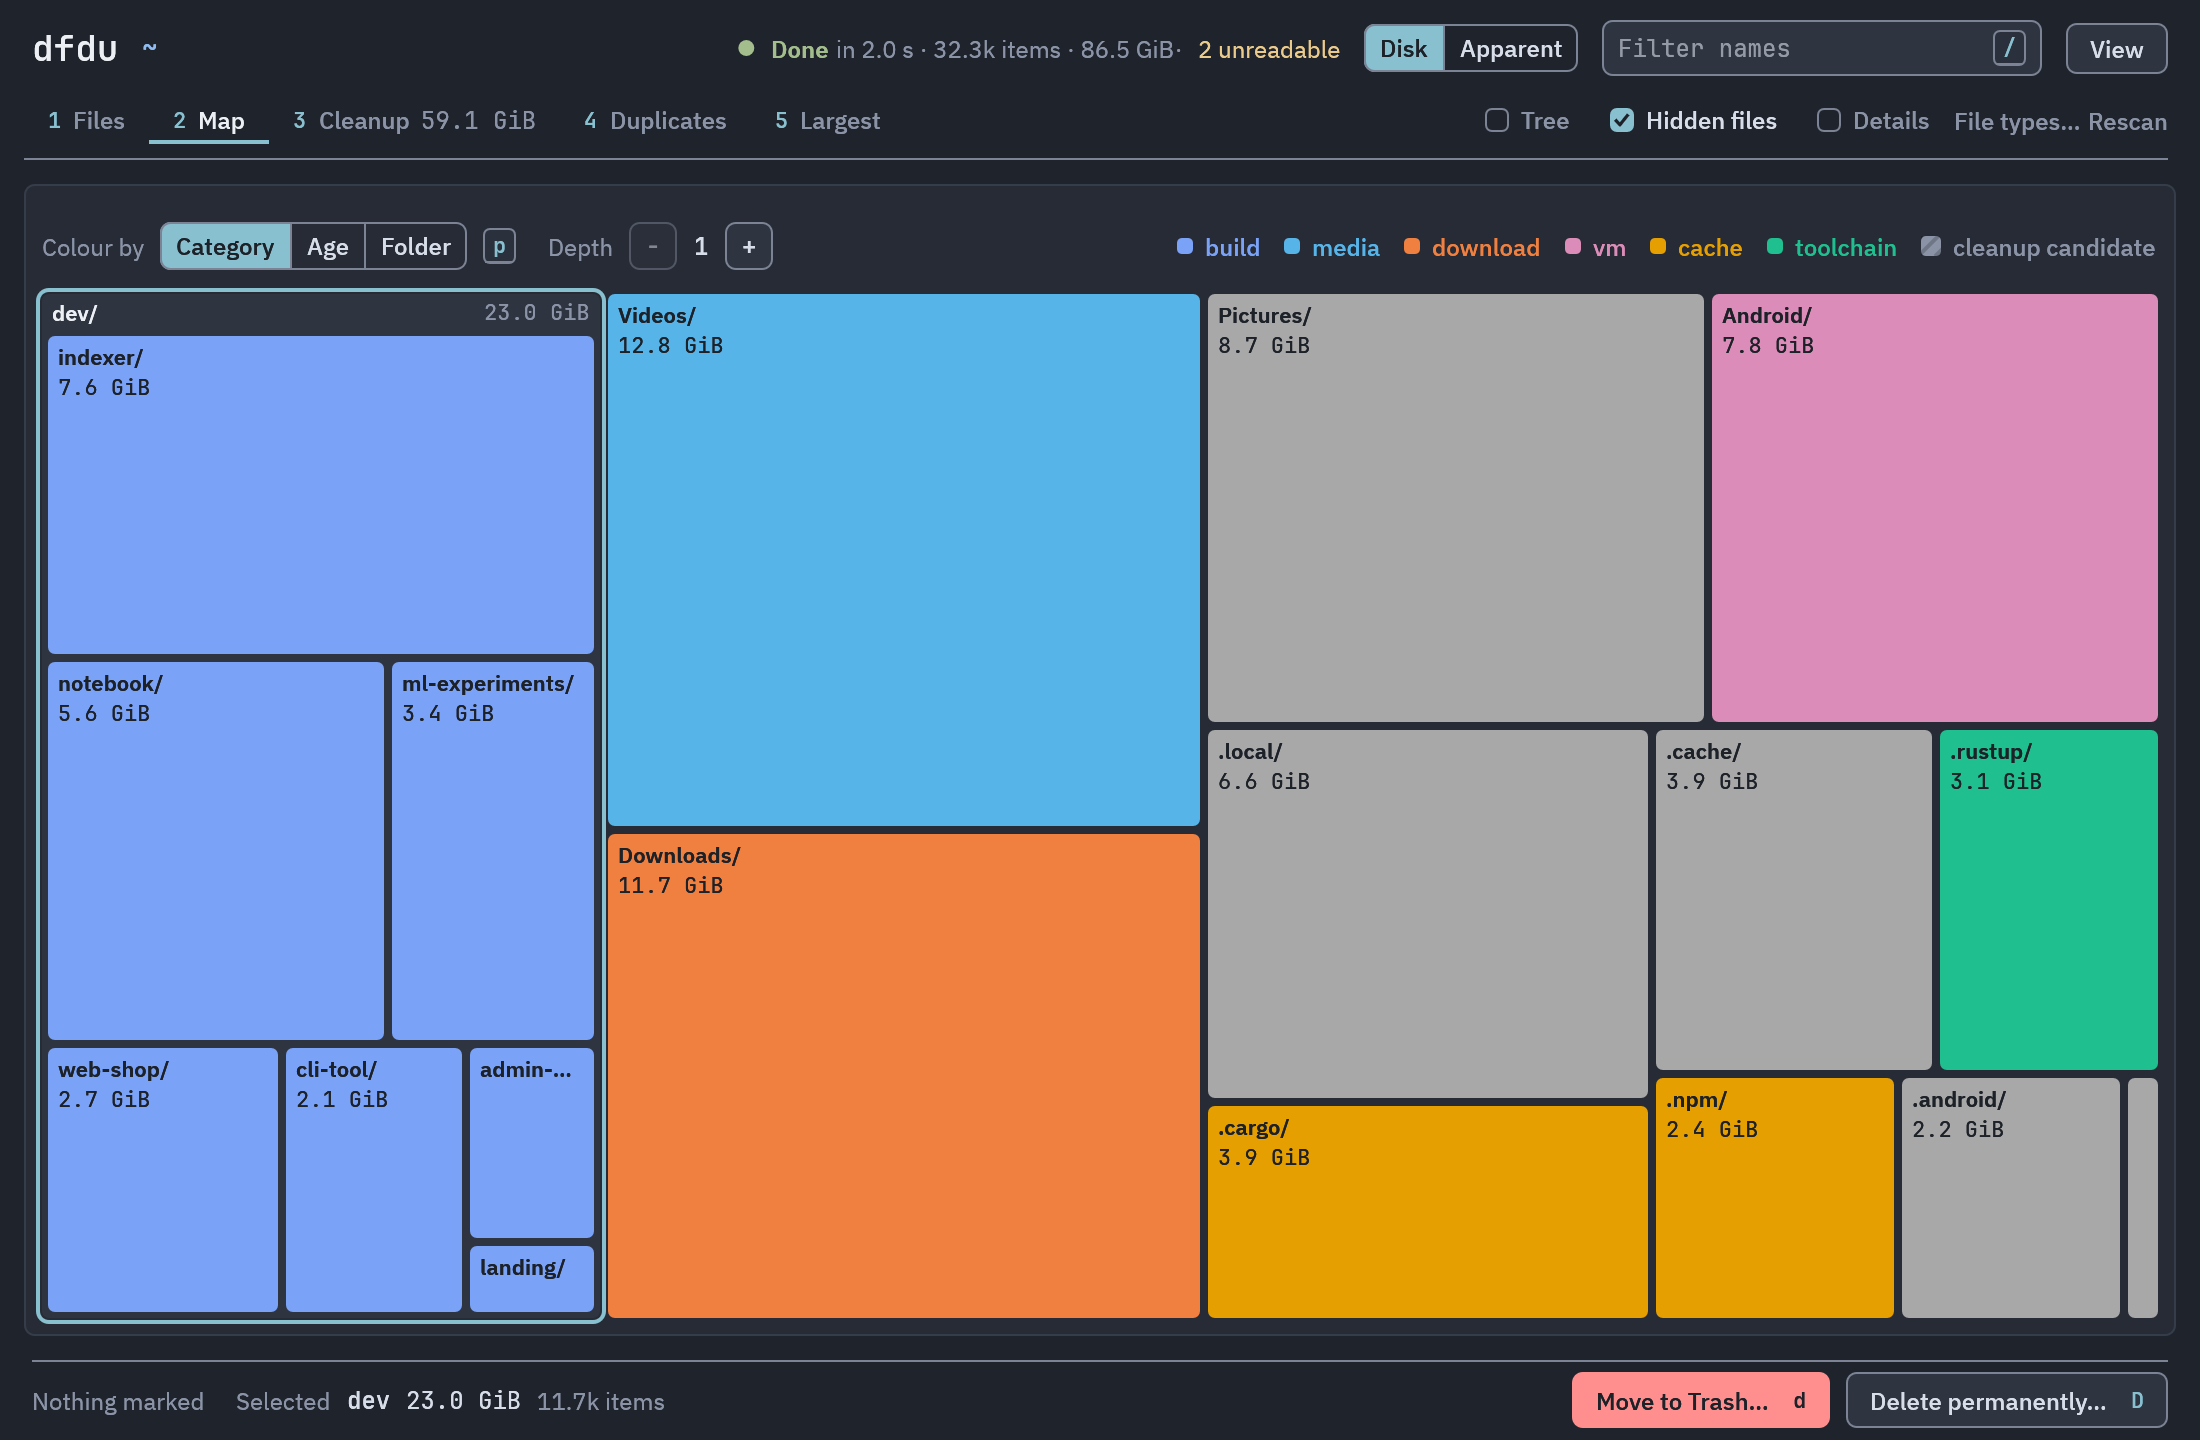
The desktop app, dfdu-gui, is the dfdu browser in a window. It shares its scanner, cleanup rules, delete checks, undo and scan history with dfdu in the terminal, and has the same five views: Files, Map, Cleanup, Duplicates and Largest. It ships with every release from 0.3.0 and runs on macOS, Linux and Windows.
Install
Section titled “Install”With Homebrew:
brew install --cask jordond/tap/dfdu-guiOr with the install script, which installs the CLI and puts dfdu.app in ~/Applications:
curl -fsSL https://dfdu.app/install.sh | sh -s -- --guiOr download the disk image and drag dfdu into Applications: dfdu-gui-aarch64-apple-darwin.dmg for Apple silicon, dfdu-gui-x86_64-apple-darwin.dmg for Intel.
x86_64 and aarch64 (aarch64 from 0.5.1). The install script installs the CLI and the AppImage as dfdu-gui next to dfdu, with a desktop entry so it shows up in your app launcher:
curl -fsSL https://dfdu.app/install.sh | sh -s -- --guiThere is also a .deb for Debian and Ubuntu, which installs /usr/bin/dfdu-gui: dfdu-gui-x86_64-unknown-linux-gnu.deb for x86_64, dfdu-gui-aarch64-unknown-linux-gnu.deb for aarch64. The AppImages are dfdu-gui-x86_64-unknown-linux-gnu.AppImage and dfdu-gui-aarch64-unknown-linux-gnu.AppImage.
sudo apt install ./dfdu-gui-x86_64-unknown-linux-gnu.deb # x86_64sudo apt install ./dfdu-gui-aarch64-unknown-linux-gnu.deb # aarch64The AppImage needs FUSE 2. If it does not start, install libfuse2 (Debian, Ubuntu; libfuse2t64 on Ubuntu 24.04), fuse2 (Arch) or fuse-libs (Fedora), or run it with --appimage-extract-and-run.
Windows
Section titled “Windows”Download and run dfdu-gui-x86_64-pc-windows-msvc-setup.exe. It installs dfdu for your user in %LOCALAPPDATA%\dfdu without administrator rights, and adds a Start menu shortcut and an uninstaller. To skip installing, unzip dfdu-gui-x86_64-pc-windows-msvc.zip and run dfdu-gui.exe.
Every file on the latest release has a .sha256 checksum next to it.
Choosing what to scan
Section titled “Choosing what to scan”Opened without a folder, the app shows a start screen listing what you can scan. This computer has your disks, with how full each one is, and a row to type a folder’s path or browse to one. Other computers has the computers you scanned lately and a row to connect to another. Pick a disk or a computer with the arrow keys and press Enter, or press a disk’s number. You can also open a folder with Cmd-O (Ctrl-O on Linux and Windows), or drop it anywhere on the window. Open a saved scan browses a scan saved with dfdu export or an ncdu export.
From a terminal, pass the folder instead:
dfdu-gui ~/DownloadsOn macOS the app is dfdu.app; run open -a dfdu --args ~/Downloads to pass it a folder.
As in the terminal, you can browse while the scan is still running, and a folder you scanned before opens from its cached scan at once and refreshes in the background.
To scan another folder without going back to the start screen, press Cmd-L or Cmd-Shift-G (Ctrl-L or Ctrl-Shift-G on Linux and Windows). The field starts with the current folder; edit it, press Tab to complete a folder name, and press Enter. In a scan of another computer, Tab asks that computer for its folders and lists them when they arrive. Clear the field, or leave only / (or a drive such as C:), to list the computer’s mounts with their filesystem type and used space; click one to put it in the field. A folder inside the scan opens at once; one outside it is scanned, the same way as the scan you are in (as an administrator, or on the same other computer). The breadcrumbs at the top also show the folders above the scan’s root, dimmed: click one to scan it. If the scan you are in is still running and the new one cannot keep what it read (see below), the first click says so and only a second click on the same folder scans it. On macOS the breadcrumbs start at the Data volume (/System/Volumes/Data): the folders above it are on the read-only system volume. At the scan’s root, pressing Backspace or h once says what is above it, and pressing it again scans that folder. A saved scan has nothing outside it to open; go back to the start screen for that. After going up, the folder you came from is selected in the new scan once it appears, and an empty folder at the scan’s root says how to go up or elsewhere.
On this computer, a scan of a folder above the one you are in keeps what the old scan read, and lists only the rest of the folder. Each folder already read is checked by its modification time and read again if it changed, as in a scan opened from the cache. A file edited in place inside a folder that did not change can show its old size until you rescan it (Rescan in the right-click menu, or r). The old scan can still be running: the folders it had not finished are read again. It must not have ended incomplete, and nothing can be being deleted or waiting to be undone. When the old folder is a disk or volume of its own, the new scan goes into it and keeps it, even when it does not cross into other filesystems. Otherwise, or when the folder’s scan is in the cache, or another disk or volume lies between the two folders, the folder is scanned as usual.
Another computer
Section titled “Another computer”Other computers on the start screen scans a folder on another machine over ssh, as dfdu --remote does. Type the computer as you would to ssh (me@nas, or a name from ~/.ssh/config) and the folder there (~ when left empty), then Connect. Key file and port sets a private key to log in with and a port. The computers you scanned lately are listed above that row; click one, or choose it with the arrow keys and press Enter, to connect again.
The app runs your own ssh, so your ssh config, keys and ssh-agent all work. When ssh needs a password, a key’s passphrase, or your say-so to trust a computer it has not connected to before, the app asks in a dialog. This needs OpenSSH 8.4 or newer (on Windows, OpenSSH 8.6 or newer).
Passwords and passphrases are kept in memory until you quit, so scanning the same computer again does not ask again. Turn on Remember in Keychain (Credential Manager on Windows, the keyring on Linux) to keep one between runs; it is never written to the app’s settings. A remembered password that stops working is forgotten and you are asked again. On Linux and Windows, other programs running as you can read what is in those stores; an ssh key with ssh-agent is the safer choice there.
If the other computer has no dfdu of this version, the app asks before sending its agent there: the release build for that computer, downloaded once and kept on yours (on macOS, your own dfdu command-line tool comes first when it is the same version and the other computer is a Mac of the same kind). The agent is kept on that computer for the next scan.
The tabs at the top switch views, or press 1 to 5.
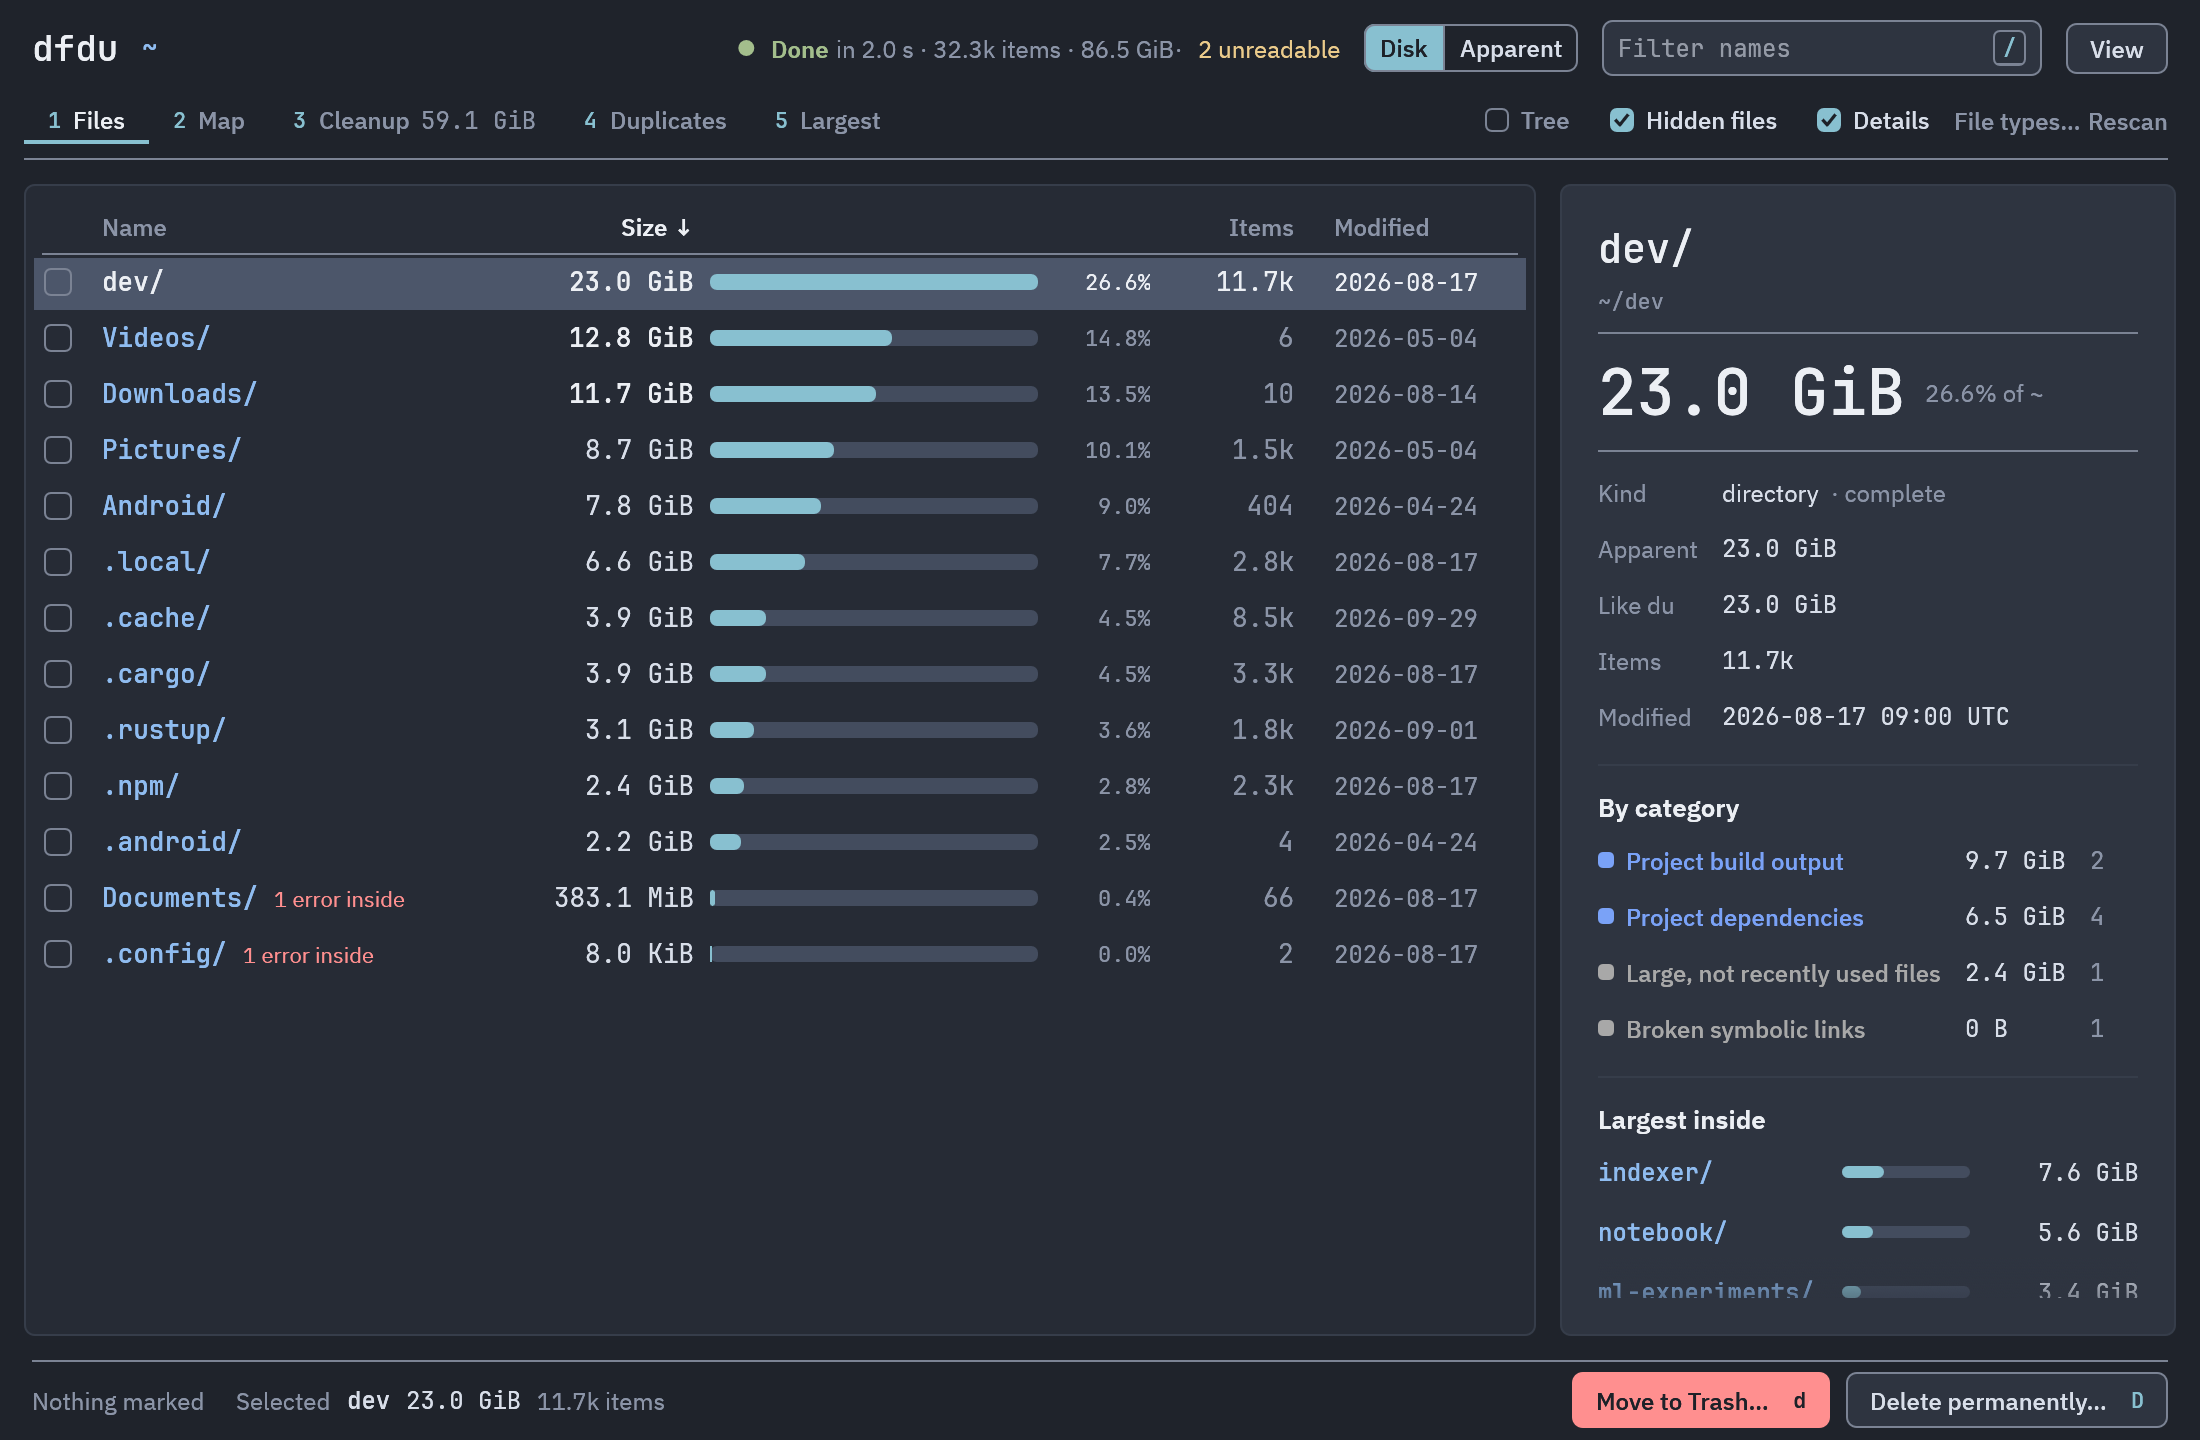
- Files (
1): the entries of the current folder with size bars. Sort from the column headers. Tick Tree to open folders in place. - Map (
2): the current folder as a treemap. Hover a tile for its size, click to select it, double-click to zoom in. Colour tiles by category, age or top folder, and change the depth with+and-. - Cleanup (
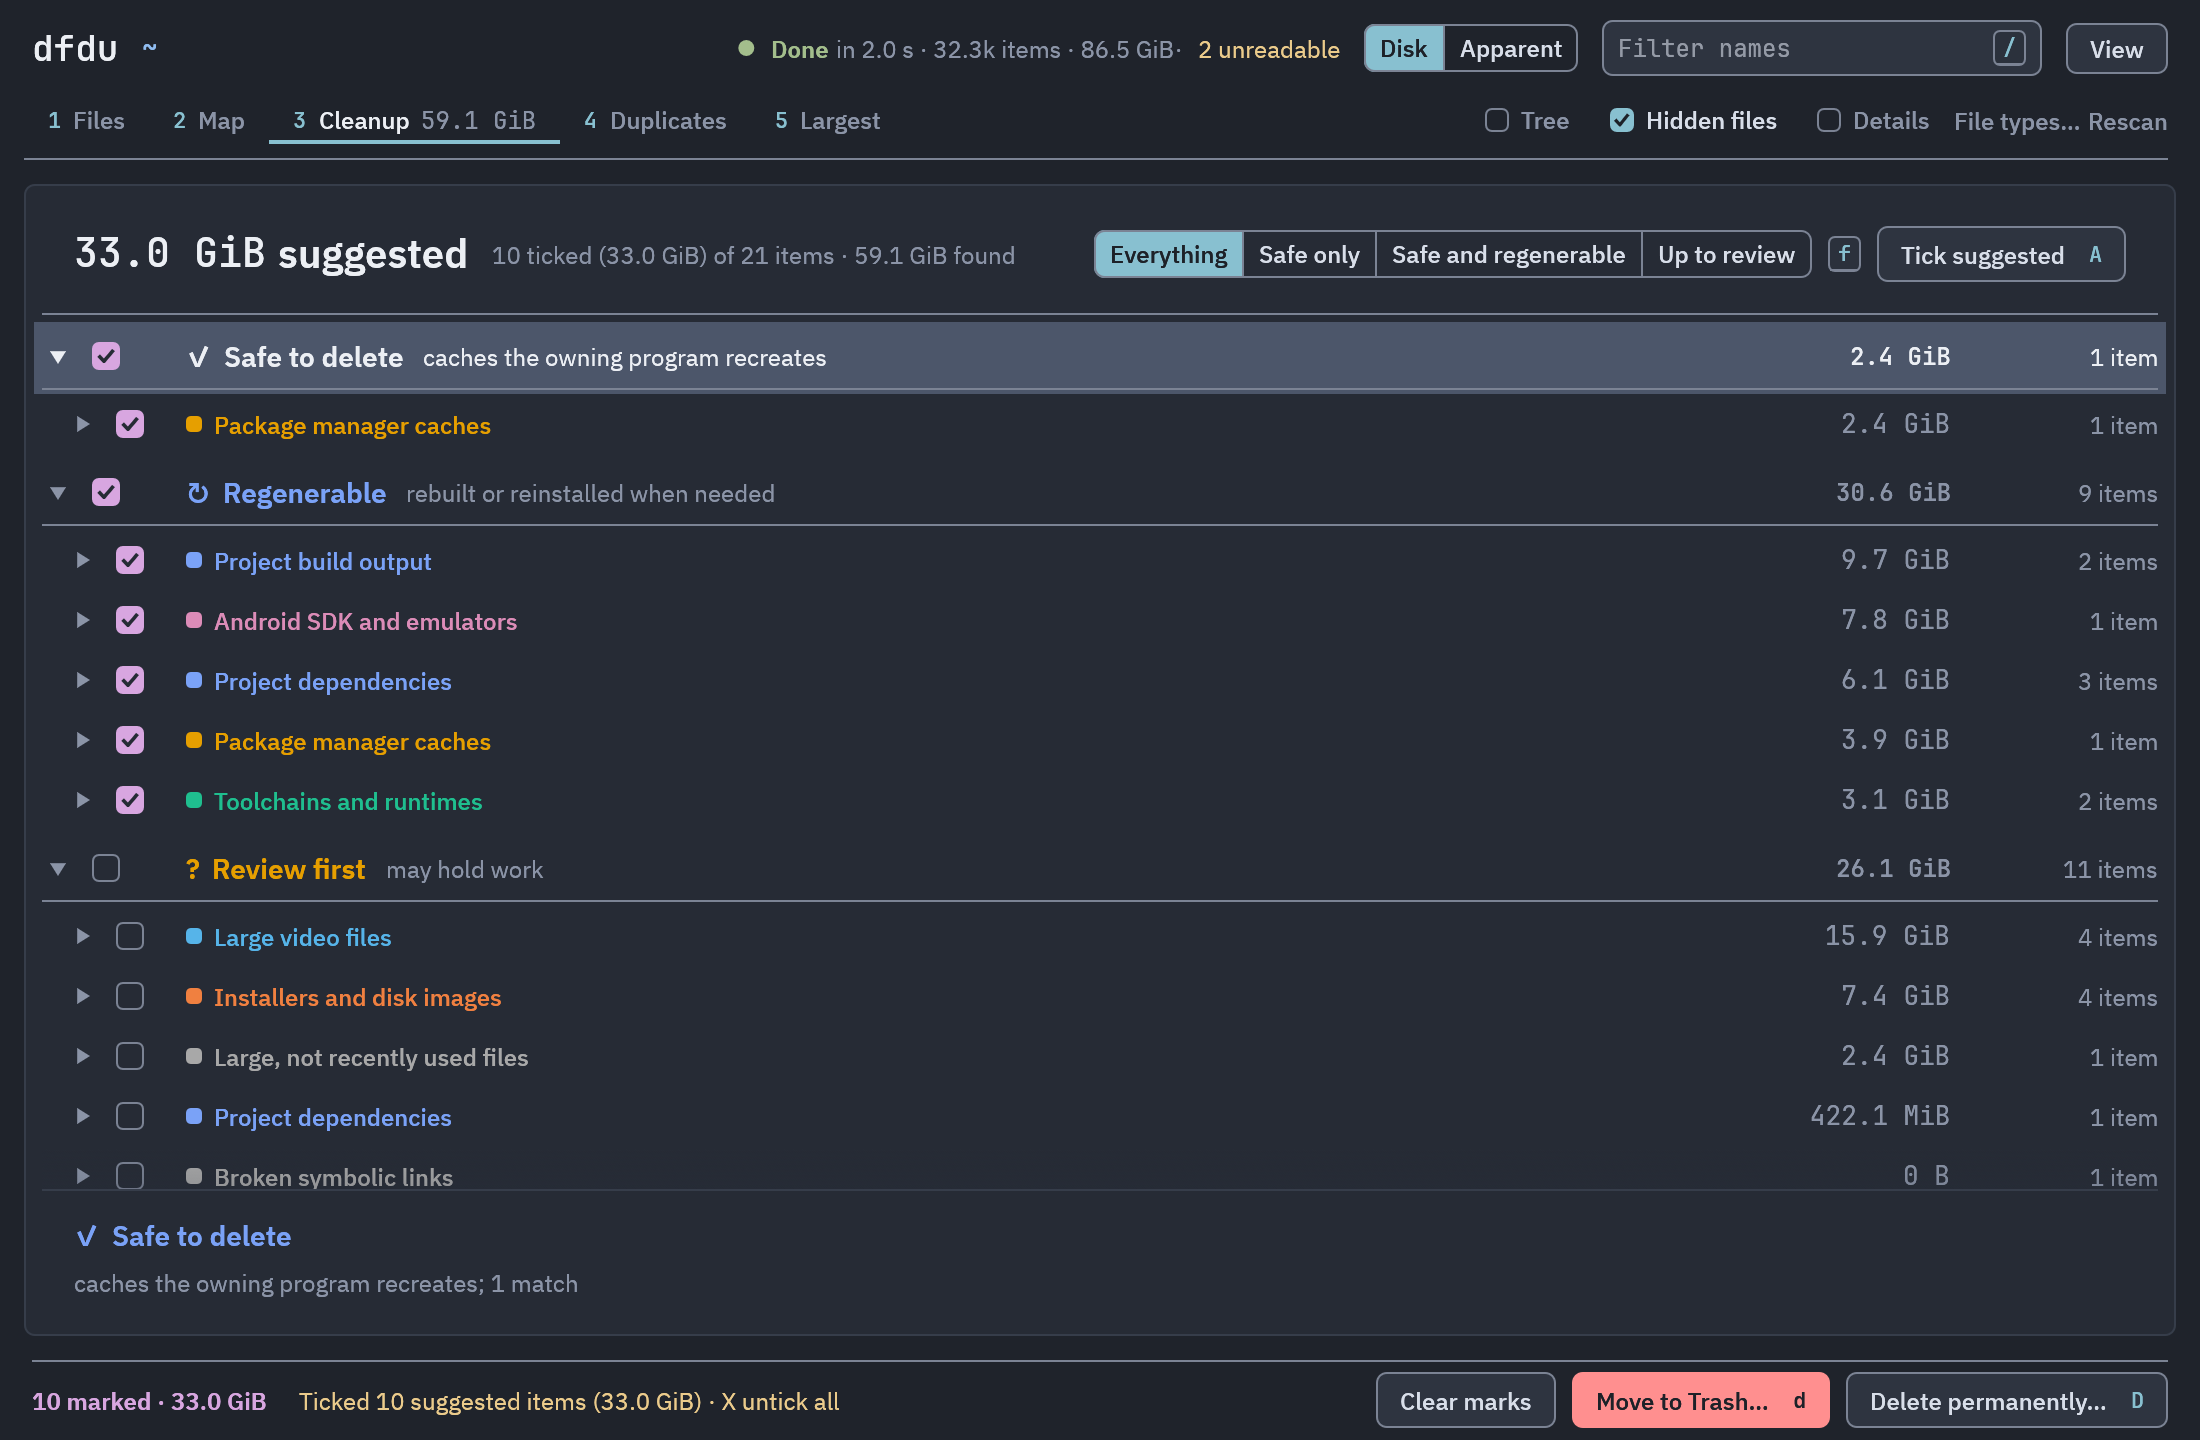
3): what the cleanup rules found in the whole scan, grouped by category and safety level. The first time you open it, the recommended items are ticked for you. - Duplicates (
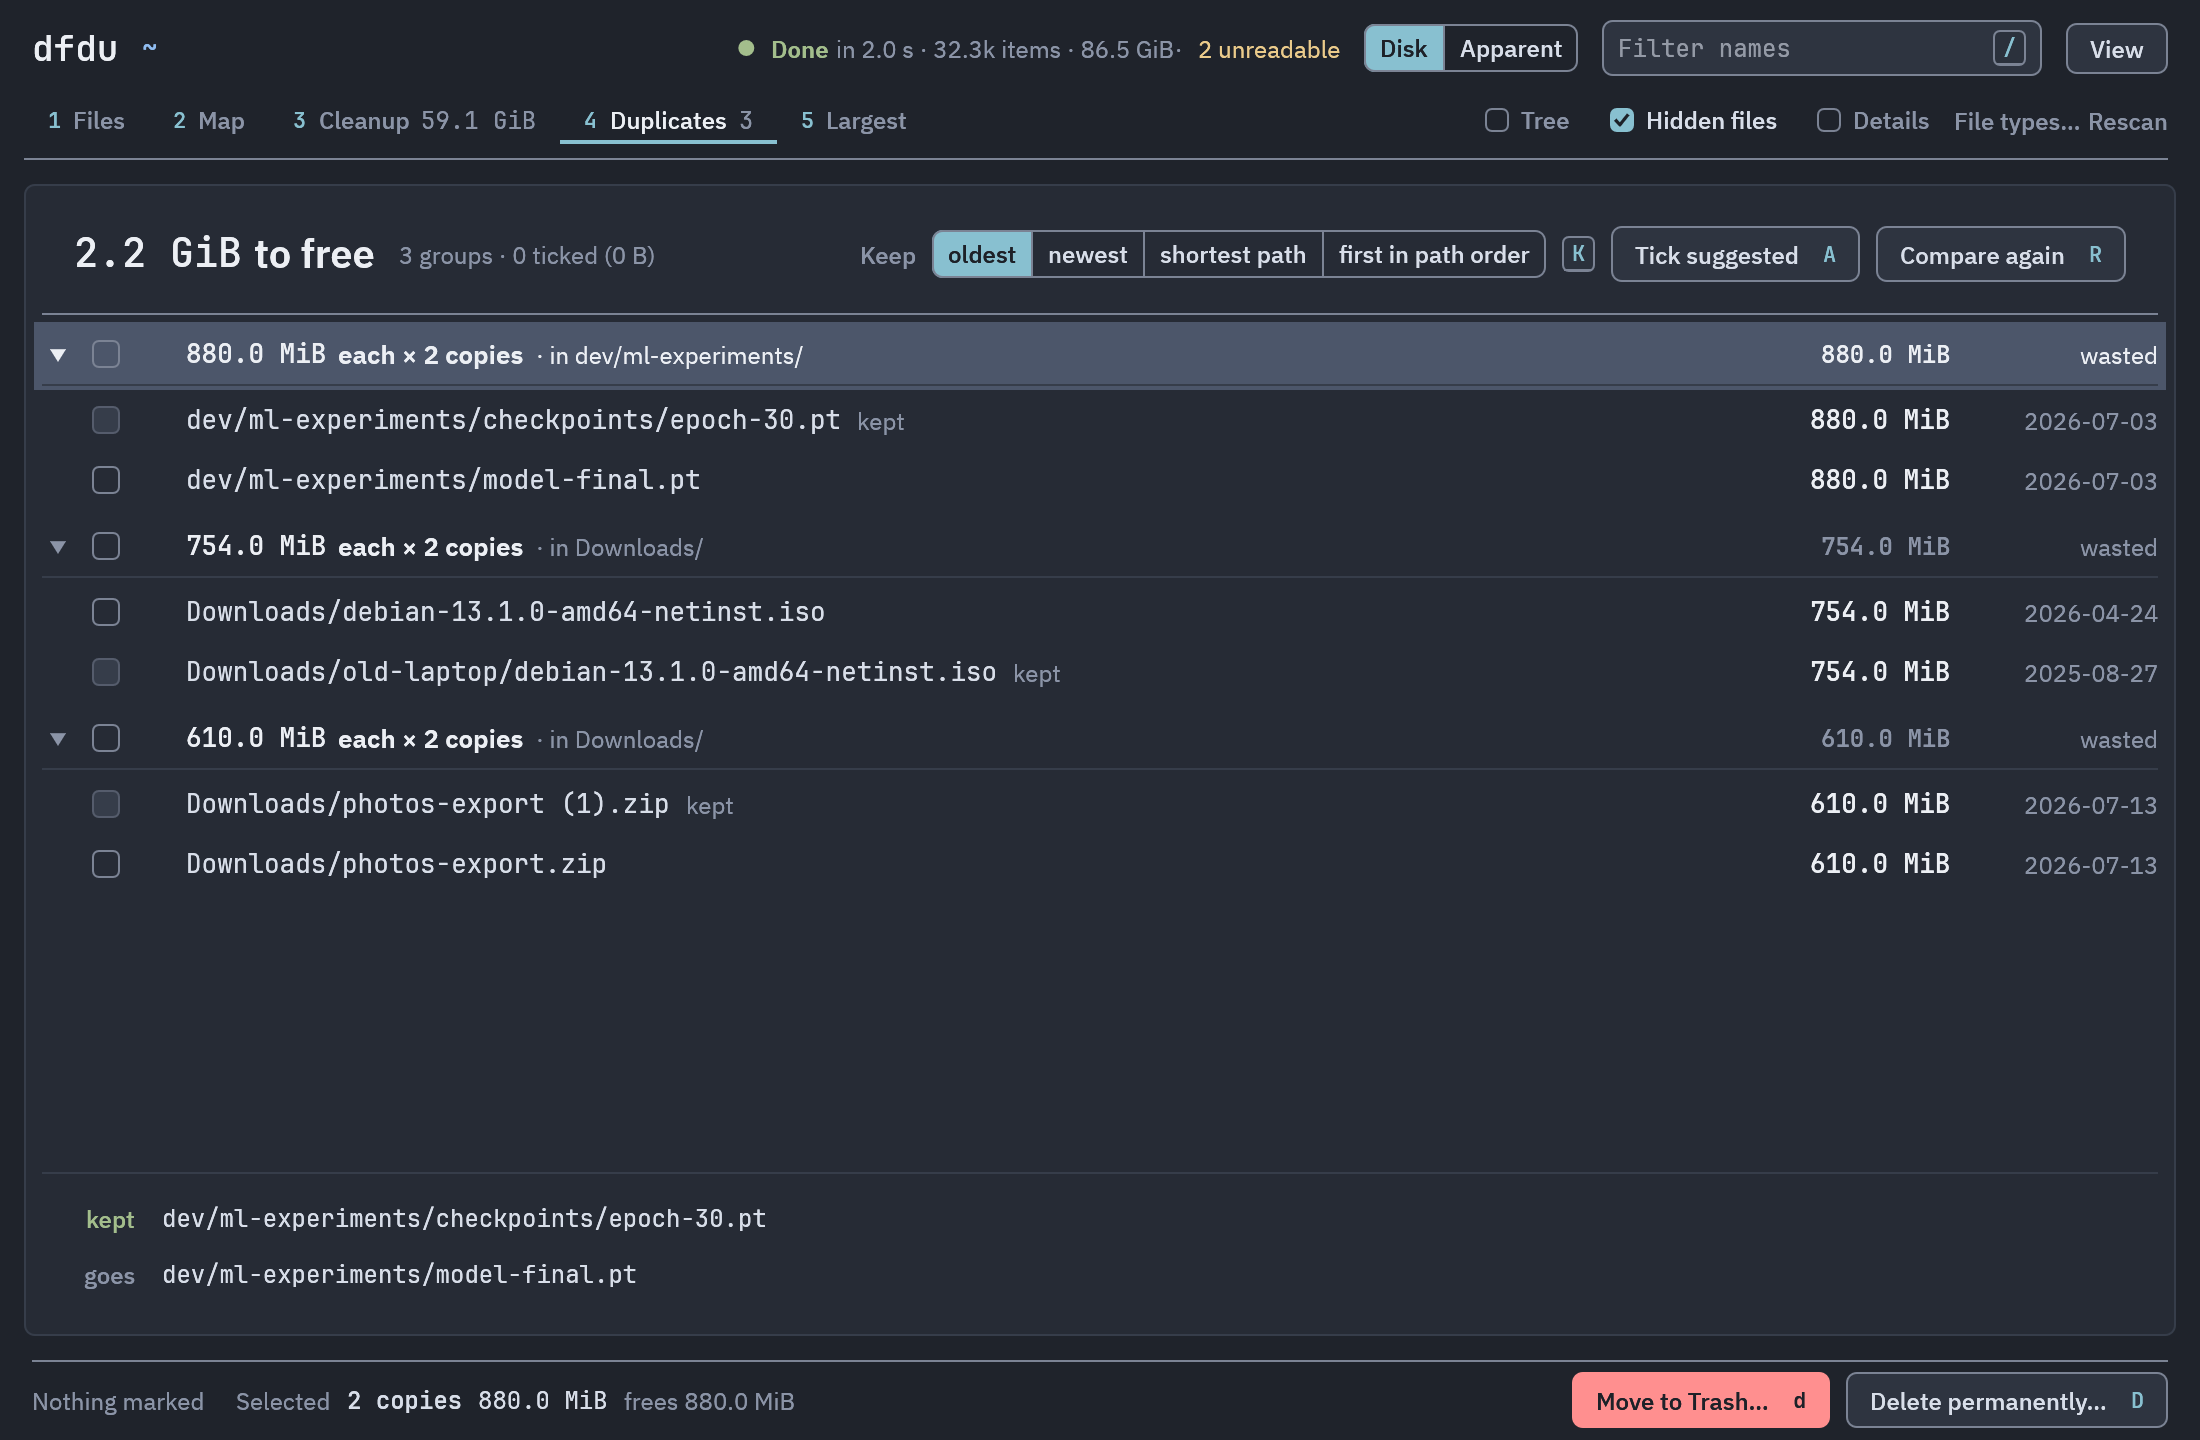
4): identical files, compared in the background with a progress bar and a cancel button. One copy in each group is kept and never ticked; pressKto keep a different copy. - Largest (
5): the biggest files below the current folder, wherever they are.
Tick Details, or press i, for a panel on the right with what the selected entry is, which rule matched it, what you lose by deleting it, how much it grew since your last scan, and its largest children.
Where a tool has its own cleanup command, such as docker system prune, select the item in Cleanup and press N. dfdu runs the command’s dry run first and only offers the real run after it succeeds.
Deleting
Section titled “Deleting”Mark entries with Space, or tick them in Cleanup and Duplicates, then press d (or Delete) to move them to the Trash, or D to delete them permanently. Right-click a row for the same actions.
The delete dialog lists the items, their total size, and how much space dfdu expects to free. It opens with Cancel selected, so pressing Enter by accident deletes nothing. Permanent deletes, and moves to the Trash of 50 GiB or more, ask you to type delete first.
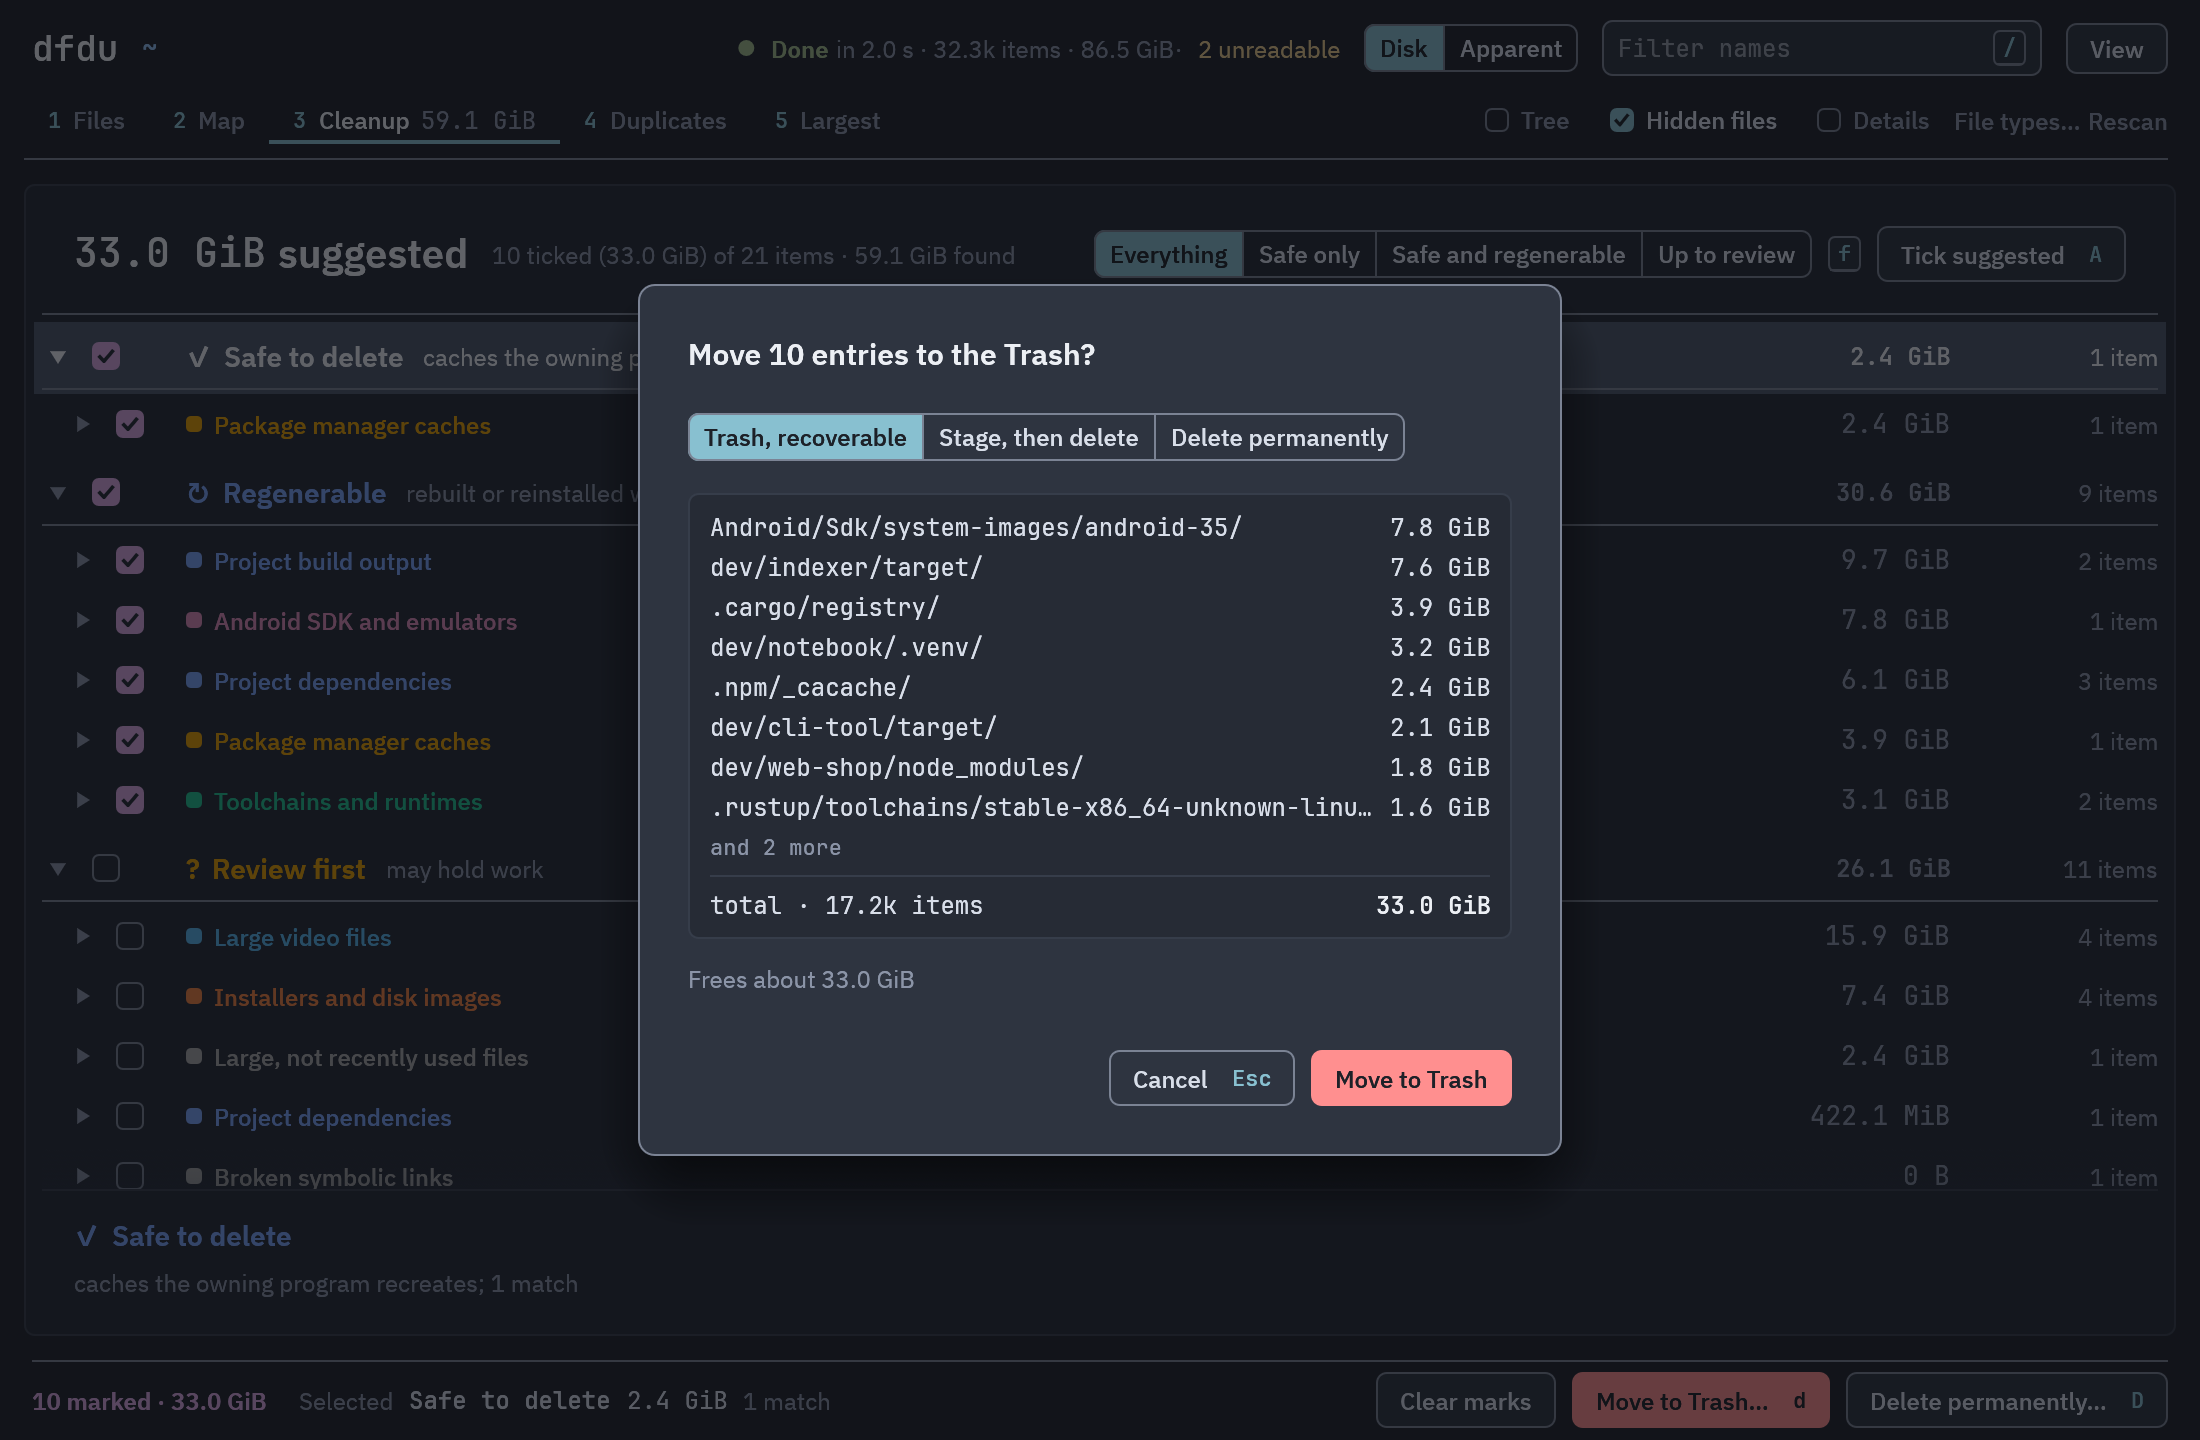
The dialog also offers staging: the items are moved to a staging folder at once and deleted a minute later. U puts back the last delete, from the Trash or, within that minute, from staging. Until then the status bar counts down, and its Delete now button deletes everything staged at once.
To browse with no way to delete, start the app with --read-only.
The keys are the same as in the terminal browser: j and k move, Enter opens a folder, s sorts by size and / filters. Press ? for the full list, with a search box.
Cmd-K (Ctrl-K on Linux and Windows) opens the command palette, which lists every action and theme with its key. A few desktop shortcuts work too:
| Shortcut | Action |
|---|---|
| Cmd-K / Ctrl-K | Command palette |
| Cmd-F / Ctrl-F | Filter this folder |
| Cmd-L / Ctrl-L | Go to a folder |
| Cmd-Shift-G / Ctrl-Shift-G | Go to a folder |
| Cmd-C / Ctrl-C | Copy the selected path |
| Delete | Move to Trash |
| Cmd-W / Ctrl-W | Close the window |
Scanning as an administrator
Section titled “Scanning as an administrator”Some folders can only be read as an administrator, and a normal scan counts them as unreadable. On macOS and Linux, turn on the Full disk access switch on the start screen to scan them too. How that works depends on the system:
- macOS: the app installs a helper that scans as root. Open View > Full disk access and follow the three steps: install the helper, allow it in System Settings > General > Login Items, and give dfdu Full Disk Access in System Settings > Privacy & Security. You only do this once. After that, a scan with the Full disk access switch on asks for an administrator’s password. View > Full disk access also removes the helper.
- Linux: each scan asks for your password through pkexec, so pkexec needs to be installed. From the terminal,
dfdu-gui --admin /srvdoes the same.
On Windows there is no switch: right-click dfdu and choose Run as administrator.
On macOS, an app opened from Finder does not get the Full Disk Access you may have given your terminal. Without it, folders such as Mail, Messages, Safari and Photos show as unreadable, and a banner offers to open the privacy settings.
Themes
Section titled “Themes”The app follows your system’s light or dark setting. Pick a theme from the View menu or the command palette, or start with --theme dark, --theme light or --theme NAME. A theme file colours both the terminal browser and the app.
Command line
Section titled “Command line”dfdu-gui [PATH] [--read-only] [--import FILE] [--no-rules] [--theme NAME] [--admin]| Option | Meaning |
|---|---|
PATH |
The folder to scan. Without it, the start screen opens. |
--read-only |
Never delete anything. |
--import FILE |
Browse a saved scan: a dfdu snapshot or an ncdu export. |
--no-rules |
No categories and no cleanup suggestions. |
--theme NAME |
auto, dark, light, or a theme file’s name. |
--admin |
Scan as an administrator (Linux). |
The command line tools (scan, report, clean, diff) are in dfdu only.
The app keeps its settings and window size in gui.ron in dfdu’s state directory, next to the scan history.